Dilated Residual Network for Image Classification and Semantic Segmentation
2020, Jan 30
- 참조 : https://towardsdatascience.com/review-drn-dilated-residual-networks-image-classification-semantic-segmentation-d527e1a8fb5
- 참조 : https://blog.naver.com/laonple/220991967450
- 이번 글에서는
Dilated Residual Network에 대하여 다루어 보려고 합니다. - 기존에
Residual Network에Dilated Convolution을 접목한 형태의 딥러닝 네트워크입니다.
목차
-
Dilated Convolution 이란
-
Dilated Convolution 적용 이유
-
Dilated Residual Network와 Pytorch 코드
Dilated Convolution 이란
- 위 이미지를 보면 왼쪽이 일반적인 convolution 연산이고 오른쪽이 dilated convolution 연산입니다.
- 위 이미지의 파란색이 입력이고 초록색이 출력인데 오른쪽의 dilated convolution을 보면 왼쪽의 일반적인 convolution과 비교하였을 때, 필터간의 간격이 있는 것을 확인할 수 있습니다.
- dilation 상수를 통해서 표현하면 왼쪽의 일반적인 convolution은 dilation이 1이고 오른쪽의 dilated convolution은 dilation이 2가 됩니다. 즉, 필터에서 픽셀 간의 간격이
dilation에 해당합니다.
- dilated convolution의 개념은 wavelet decomposition 알고리즘에서
atrous algorithm이라는 이름으로도 사용되었습니다. 따라서 dilated convolution, atrous convolution 이라고 불립니다. 이 글에서는 dilated convolution 이라고 칭하겠습니다. - 참고로 dilated convolution이라고 시작하게된 계기는 FCN을 발전시킨 Fisher Yu의 Multi-Scale Context Aggregation by Dilated Convolutions에서 시작되었고 atrous convolution은 deeplab 논문에서 사용되었습니다.
- atrous는 프랑스어로 구멍이라는 뜻입니다.

- dilated convolution을 적용하면 소위 말하는
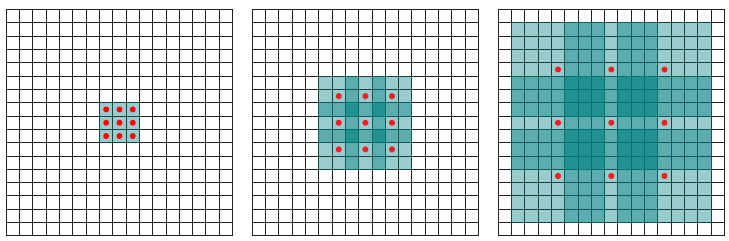
receptive field가 넓어지게 됩니다. receptive field는 convolution filter가 커버하는 영역이라고 생각하면 됩니다. 따라서receptive field가 넓어진다는 것은 필터가 받아들이는 영역이 넓어진다는 것이고 필터가 넓은 범위를 본다고 생각하시면 됩니다.- 위 그림에서 빨간색 점이 있는 위치에서만 필터의 파라미터가 존재한다고 생각하시면 됩니다.
- 앞에서 설명한 바와 같이 가장 왼쪽의 그림은
dilation이 1인 convolution filter 입니다. (input : 3 x 3 영역 → output : 3 x 3 영역) - 가운데 그림은
dilation이 2가 적용되었습니다. 여기서도 빨간색 점이 연산에 사용되는 필터의 파라미터 입니다. 따라서 가운데 그림의 경우 output으로 3 x 3 을 만들었을 때 input의 receptive field는 7 x 7이 됩니다. (input : 7 x 7 영역 → output : 3 x 3 영역) - 가장 오른쪽 그림의 경우
dilation이 4가 적용되었습니다. 가운데 그림과 동일한 원리로 receptive field가 15 x 15로 아주 넓습니다. (input : 15 x 15 영역 → output : 3 x 3 영역)
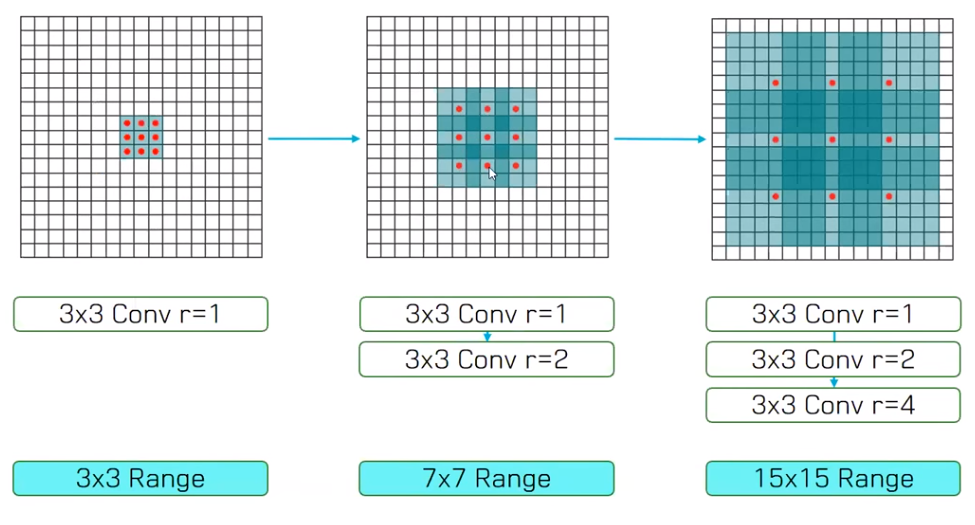
- 따라서 위 그림과 같이 dilation rate가 서로 다른 3 x 3 convolution을 한 지점에서 여러 개 사용함으로써 receptive field를 늘릴 수 있습니다.
Dilated Convolution 적용 이유
- 일단 Dilated Convolution을 적용한 이유는 앞에서 설명한 바와 같이 receptive field를 효율적으로 넓게 보기 위함 입니다
- Dilated convolution을 사용하면 receptive field는 커지지만 파라미터 갯수는 늘어나지 않기 때문에
연산량 관점에서 효과를 볼 수 있습니다. - 만약 receptive field가 7 x 7인 영역을 단순히 dilation이 1인 일반적인 convolution filter를 사용한다면 7 x 7 convolution filter를 사용하여야 하며 파라미터의 갯수는 49(7 x 7)개가 필요하게 됩니다. 하지만 dilation을 적용하면 9(3 x 3)개만 필요할 뿐입니다.
- receptive field를 효율적으로 넓게 보려는 목적은 다양한 scale의 receptive field를 보기 위함입니다.
- 다양한 dilation을 적용하면 다양한 receptive field를 사용할 수 있고 이를 통하여 다양한 scale의 정보가 대응이 가능해집니다.
- dilated convolution 없이 넓은 receptive field를 보는 방법은 2가지가 있습니다.
- 1) 크기가 큰 convolution filter를 사용하는 방법 : 이는 연산량 증가로 비효율적임을 확인하였습니다.
- 2) pooling을 통하여 input을 downsampling 하는 방법
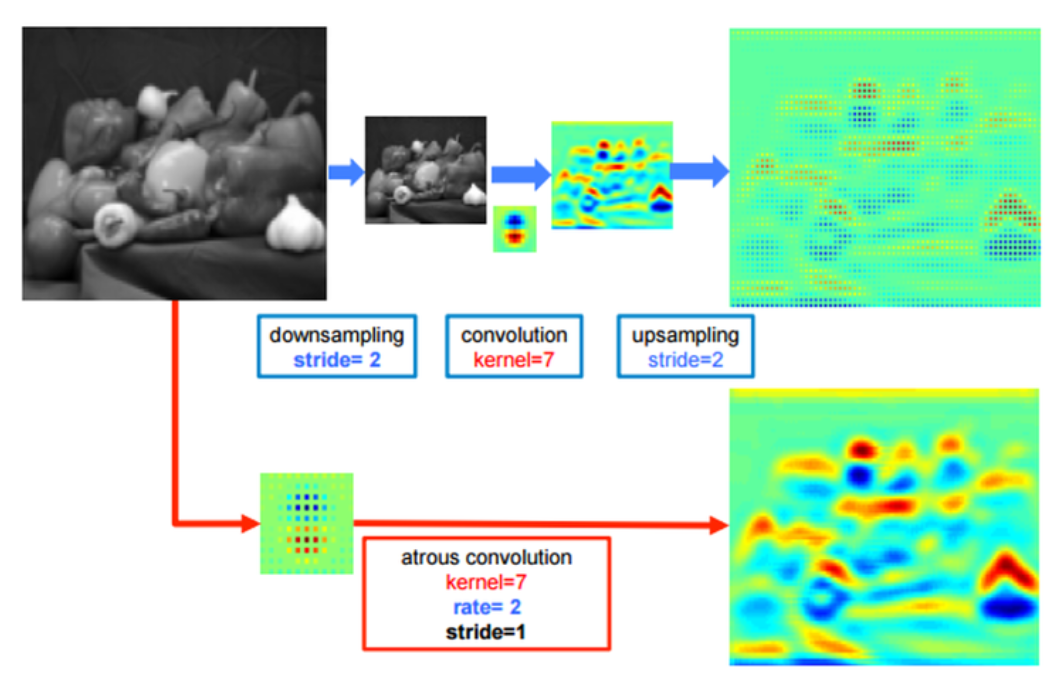
- 만약 pooling을 통하여 input을 downsampling 하는 방법을 사용한다면 어떤 단점이 발생할까요? 위 그림을 한번 살펴보겠습니다.
- 그림의 윗쪽 path는 pooling과 stride를 이용하여 downsampling을 통해 input의 크기를 먼저 줄입니다. 그 다음 convolution 연산을 한 다음에 upsampling을 통해 원본 영상 크기로 다시 확장시킵니다.
- 반면 그림의 아랫쪽 path는 dilated(atrous) convolution을 적용시켜서 down/up sampling 없이 원본 크기를 유지합니다.
- 두 방법의 결과를 weight의 heatmap을 통하여 살펴보았을 때, dilated convolution을 사용한 쪽의 결과가 더 좋은 것을 확인하실 수 있습니다. pooling을 사용한 방법에서는 detail이 상대적으로 떨어집니다. 이렇게 되면 최종 segmentation 결과가 뭉쳐서 나올 수 있습니다.
- pooling을 통하여 input을 downsampling 하는 방법이 시도되었던 이유는 딥러닝을 이용한 컴퓨터 비전 문제 접근이 classification 또는 detection 부터 시작되었기 때문입니다.
- classification과 detection 모두 object의 존재 여부가 가장 큰 관심사입니다. classification과 detection은 여러 단계의 convolution과 pooling 연산을 거쳐서 이미지 내에 존재하는 object들의 핵심이 되는 feature를 추출해 내야 합니다. 따라서 위치를 파악하기 위해 핵심이 되는 feature 들을 max pooling을 통해 뽑아내게 되고(덜 중요한 feature는 max pool을 통해 제거됨) 그 결과 feature map의 크기가 줄어들게 됩니다.
- 이 방법을 이용하면 object의 위치를 찾는 데 좋은 효과를 얻을 수 있습니다. 즉 픽셀 단위의 detail 함보다는 object의 위치를 찾는 global 함을 택한 것입니다.
- 이와 같이 classification과 detection는 segmentation과 문제를 접근하는 관점의 차이가 있기 때문에 classification과 detection에 사용되는
conv + pool전략을 그대로 사용하면 segmentation에서는 detail에 취약한 단점이 발생할 수 있습니다.
- 이와 같은 이유들을 종합하였을때,
dilated convolution을 이용하여 segmentation을 하는 것에 상당한 효과가 있습니다.
- 그러면 dilated convolution의 개념을 Sementic Segmentation에 적용해 보도록 하겠습니다.
- 기본적으로 dilated convolution을 FCN에 접목할 때에는 기존에 사용하던 pooling layer 일부를 제거하고 그 자리에 dilated convolution을 접목할 수 있습니다.
- Semantic Segmentation에서 output의 성능을 높이려면 큰 output feature map이 필요합니다. 앞에서 다룬 detail과 관련된 내용입니다.
- FCN에서
32x upsampling만 하게 되면 성능이 좋지 못한 segmentation 결과를 얻을 수도 있는데, 이런 이유로16x upsampling또는8x upsampling등을 적용하여 좀 더 큰 (resolution이 높은) output feature map을 얻게 됩니다. - 좀 더 큰 output feature map을 얻기 위해서 Segmentation을 위한 Encoder에서 단순히 subsampling을 제거하는 방법도 사용할 수 있지만, 이렇게 하면 receptive field가 감소하게 되고 그 결과 네트워크의 이미지 context를 이해 능력이 떨어져 최종 성능이 떨어지게 됩니다.
- 이러한 이유로
dilated convolution을 적용하여 receptive field를 늘릴 수 있습니다.
Dilated Residual Network와 Pytorch 코드
- Pytorch 코드를 살펴보면서 Dilated Convolution이 어떻게 적용되는 지 살펴보겠습니다.
import math
import torch.utils.model_zoo as model_zoo
import torch.nn as nn

__all__ = ['ResNet', 'resnet18', 'resnet34', 'resnet50', 'resnet101',
           'resnet152', 'BasicBlock', 'Bottleneck']

model_urls = {
    'resnet18': 'https://download.pytorch.org/models/resnet18-5c106cde.pth',
    'resnet34': 'https://download.pytorch.org/models/resnet34-333f7ec4.pth',
    'resnet50': 'https://download.pytorch.org/models/resnet50-19c8e357.pth',
    'resnet101': 'https://download.pytorch.org/models/resnet101-5d3b4d8f.pth',
    'resnet152': 'https://download.pytorch.org/models/resnet152-b121ed2d.pth',
}


def conv3x3(in_planes, out_planes, stride=1):
    '''
    - 입력 : 입력 채녈 수, 출력 채널 수, stride
    - 출력 : convolution 필터를 적용한 feature
    - 3x3 필터를 사용하는 기본적인 convolution 필터 함수
    - #filter = 3x3, #padding = 1로 고정
    '''
    return nn.Conv2d(in_planes, out_planes, kernel_size=3, stride=stride, padding=1, bias=False)


class BasicBlock(nn.Module):
    '''
    ResNet BasicBlock
    - 입력 : in_planes(입력 채널 수), out_planes(출력 채널 수), stride, dilation, downsample, previous_dilation
    - 출력 : BasicBlock 객체
    - Convolution - BatchNorm - ReLU 2번을 하면서 skip connection을 만든다. 필요 시 downsample도 수행함
    '''
    expansion = 1
    def __init__(self, in_planes, out_planes, stride=1, dilation=1, downsample=None, previous_dilation=1):
        super(BasicBlock, self).__init__()
        self.conv1 = nn.Conv2d(in_planes, out_planes, kernel_size=3, stride=stride,
                               padding=dilation, dilation=dilation, bias=False)
        self.bn1 = nn.BatchNorm2d(out_planes)
        self.relu = nn.ReLU(inplace=True)
        self.conv2 = nn.Conv2d(out_planes, out_planes, kernel_size=3, stride=1,
                               padding=previous_dilation, dilation=previous_dilation, bias=False)
        self.bn2 = nn.BatchNorm2d(out_planes)
        self.downsample = downsample
        self.stride = stride

    def forward(self, x):
        residual = x

        out = self.conv1(x)
        out = self.bn1(out)
        out = self.relu(out)

        out = self.conv2(out)
        out = self.bn2(out)

        if self.downsample is not None:
            residual = self.downsample(x)

        out += residual
        out = self.relu(out)

        return out


class Bottleneck(nn.Module):
    '''
    ResNet Bottleneck
    - 입력 : in_planes(입력 채널 수), out_planes(출력 채널 수), stride, dilation, downsample, previous_dilation
    - 출력 : Bottleneck 객체
    - Convolution - BatchNorm - ReLU 3번을 하면서 Bottleneck 구조와 skip connection을 만든다. 필요 시 downsample도 수행함
    '''
    expansion = 4
    def __init__(self, in_planes, out_planes, stride=1, dilation=1,
                 downsample=None, previous_dilation=1):
        super(Bottleneck, self).__init__()
        self.conv1 = nn.Conv2d(in_planes, out_planes, kernel_size=1, bias=False)
        self.bn1 = nn.BatchNorm2d(out_planes)
        self.conv2 = nn.Conv2d(
            out_planes, out_planes, kernel_size=3, stride=stride,
            padding=dilation, dilation=dilation, bias=False)
        self.bn2 = nn.BatchNorm2d(out_planes)
        self.conv3 = nn.Conv2d(
            out_planes, out_planes * 4, kernel_size=1, bias=False)
        self.bn3 = nn.BatchNorm2d(out_planes * 4)
        self.relu = nn.ReLU(inplace=True)
        self.downsample = downsample
        self.dilation = dilation
        self.stride = stride

    def _sum_each(self, x, y):
        assert(len(x) == len(y))
        z = []
        for i in range(len(x)):
            z.append(x[i]+y[i])
        return z

    def forward(self, x):
        residual = x

        out = self.conv1(x)
        out = self.bn1(out)
        out = self.relu(out)

        out = self.conv2(out)
        out = self.bn2(out)
        out = self.relu(out)

        out = self.conv3(out)
        out = self.bn3(out)

        if self.downsample is not None:
            residual = self.downsample(x)

        out += residual
        out = self.relu(out)

        return out


class ResNet(nn.Module):
    """Dilated Pre-trained ResNet Model, which reduces the stride of 8 featuremaps at conv5.
    Parameters
    ----------
    - block : BasicBlock 또는 Bottleneck
        - Residual Block의 타입을 정합니다.
        - 타입은 BasicBlock 또는 Bottleneck으로 위에 선언한 클래스에 해당합니다.
    layers : int 값을 가지는 list
        - 각각의 block에서의 layer 수를 입력
    classes : int, 기본값은 1000
        - classification 할 class의 갯수
    dilated : bool, 기본값은 True
        - Dilated Convolution을 적용 할 지에 대한 Bool 값
    """

    def __init__(self, block, layers, num_classes=1000, dilated=True):
        self.in_planes = 64
        super(ResNet, self).__init__()
        self.conv1 = nn.Conv2d(3, 64, kernel_size=7, stride=2, padding=3,
                               bias=False)
        self.bn1 = nn.BatchNorm2d(64)
        self.relu = nn.ReLU(inplace=True)
        self.maxpool = nn.MaxPool2d(kernel_size=3, stride=2, padding=1)
        self.layer1 = self._make_layer(block, 64, layers[0])
        self.layer2 = self._make_layer(block, 128, layers[1], stride=2)
        if dilated:
            self.layer3 = self._make_layer(block, 256, layers[2], stride=1, dilation=2)
            self.layer4 = self._make_layer(block, 512, layers[3], stride=1, dilation=4)
        else:
            self.layer3 = self._make_layer(block, 256, layers[2], stride=2)
            self.layer4 = self._make_layer(block, 512, layers[3], stride=2)
        self.avgpool = nn.AvgPool2d(7)
        self.fc = nn.Linear(512 * block.expansion, num_classes)

        for m in self.modules():
            if isinstance(m, nn.Conv2d):
                n = m.kernel_size[0] * m.kernel_size[1] * m.out_channels
                m.weight.data.normal_(0, math.sqrt(2. / n))
            elif isinstance(m):
                m.weight.data.fill_(1)
                m.bias.data.zero_()

    def _make_layer(self, block, planes, blocks, stride=1, dilation=1):
        downsample = None
        if stride != 1 or self.in_planes != planes * block.expansion:
            downsample = nn.Sequential(
                nn.Conv2d(self.in_planes, planes * block.expansion,
                          kernel_size=1, stride=stride, bias=False),
                nn.BatchNorm2d(planes * block.expansion),
            )

        layers = []
        if dilation == 1 or dilation == 2:
            layers.append(block(self.in_planes, planes, stride, dilation=1,
                                downsample=downsample, previous_dilation=dilation))
        elif dilation == 4:
            layers.append(block(self.in_planes, planes, stride, dilation=2,
                                downsample=downsample, previous_dilation=dilation))
        else:
            raise RuntimeError("=> unknown dilation size: {}".format(dilation))

        self.in_planes = planes * block.expansion
        for i in range(1, blocks):
            layers.append(block(self.in_planes, planes, dilation=dilation, previous_dilation=dilation))

        return nn.Sequential(*layers)

    def forward(self, x):
        x = self.conv1(x)
        x = self.bn1(x)
        x = self.relu(x)
        x = self.maxpool(x)

        x = self.layer1(x)
        x = self.layer2(x)
        x = self.layer3(x)
        x = self.layer4(x)

        x = self.avgpool(x)
        x = x.view(x.size(0), -1)
        x = self.fc(x)

        return x


def resnet18(pretrained=False, **kwargs):
    """Constructs a ResNet-18 model.
    Args:
        pretrained (bool): If True, returns a model pre-trained on ImageNet
    """
    model = ResNet(BasicBlock, [2, 2, 2, 2], **kwargs)
    if pretrained:
        model.load_state_dict(model_zoo.load_url(model_urls['resnet18']))
    return model


def resnet34(pretrained=False, **kwargs):
    """Constructs a ResNet-34 model.
    Args:
        pretrained (bool): If True, returns a model pre-trained on ImageNet
    """
    model = ResNet(BasicBlock, [3, 4, 6, 3], **kwargs)
    if pretrained:
        model.load_state_dict(model_zoo.load_url(model_urls['resnet34']))
    return model


def resnet50(pretrained=False, **kwargs):
    """Constructs a ResNet-50 model.
    Args:
        pretrained (bool): If True, returns a model pre-trained on ImageNet
    """
    model = ResNet(Bottleneck, [3, 4, 6, 3], **kwargs)
    if pretrained:
        model.load_state_dict(model_zoo.load_url(model_urls['resnet50']))
    return model


def resnet101(pretrained=False, **kwargs):
    """Constructs a ResNet-101 model.
    Args:
        pretrained (bool): If True, returns a model pre-trained on ImageNet
    """
    model = ResNet(Bottleneck, [3, 4, 23, 3], **kwargs)
    if pretrained:
        model.load_state_dict(model_zoo.load_url(model_urls['resnet101']))
    return model


def resnet152(pretrained=False, **kwargs):
    """Constructs a ResNet-152 model.
    Args:
        pretrained (bool): If True, returns a model pre-trained on ImageNet
    """
    model = ResNet(Bottleneck, [3, 8, 36, 3], **kwargs)
    if pretrained:
        model.load_state_dict(model_zoo.load_url(model_urls['resnet152']))
    return model