PyQt5 개념 및 코드 snippets
2019, Dec 09
- 설치 :
pip install pyqt5 - 물론 설치는 가상 환경을 새로 만들어서 설치하는 것을 권장드립니다.
- 참조 : https://wikidocs.net/book/2165
- 간단한 예제를 통하여 아래 내용을 살펴보도록 하겠습니다.
목차
-
PyQt5 개념 관련 글
-
PyQt5 설치
-
PyQt5 기본 예제
-
Signals, Slots, Events
-
Window 생성
-
Label Widget
-
Buttons
-
LineEdit Widget (ID, 비밀번호 입력)
-
CheckBox 사용법
-
PyQt5 코드 관련 글
-
Window 타이틀 설정
-
Window 크기 설정
-
QLabel 필수 정보 변경
-
디렉토리 설정 이벤트 함수
-
Line Edit 설정 이벤트 함수
-
메시지 박스 생성 이벤트 함수
-
MainWindow 종료
-
기타
-
Tkinter를 이용한 화면 해상도 확인
PyQt5 설치
- PyQt5 설치 :
pip install pyqt5 - 리눅스 사전 설치 :
sudo apt install libxkbcommon-x11-0 libxcb-xinerama0
PyQt5 기본 예제
- PyQT5를 이용하여 Hello World를 실행해 보도록 하겠습니다. 먼저 코드를 보고 자세히 설명하겠습니다.
import sys
from PyQt5.QtWidgets import QApplication, QLabel, QMainWindow
from PyQt5.QtCore import Qt

# QMainWindow 하위 클래스를 사용하여 응용 프로그램의 기본 창을 사용자 지정합니다.
class MainWindow(QMainWindow):

    def __init__(self, *args, **kwargs):
        super(MainWindow, self).__init__(*args, **kwargs)

        self.setWindowTitle("Title")

        label = QLabel("Hello World")

        # `Qt` 네임 스페이스에는 사용자 정의 할 수있는 많은 속성이 있습니다.
        # widgets의 기능은 다음 링크를 참조하시기 바랍니다.http://doc.qt.io/qt-5/qt.html
        label.setAlignment(Qt.AlignCenter)

        # Window의 중앙 위젯을 설정합니다.
        # 위젯은 기본적으로 Window의 모든 공간을 차지하도록 확장됩니다.
        self.setCentralWidget(label)


app = QApplication(sys.argv)

window = MainWindow()
window.show()

app.exec_()
- 위 코드를 실행하면 화면 가운데에 QLabel이 표시되며 마우스를 이용하여 크기를 조절할 수 있습니다.
- 위 코드에서
QApplication에 대하여 먼저 알아보도록 하겠습니다. QApplication은 Qt의 Event Loop를 관리하며 Qt를 이용한 프로그램에는 최소 하나의 QApplication이 필요합니다.- 동작할 작업들은 계속 대기하고 있다가
QApplication.exec_()을 만나면 동작을 시작합니다. 위 코드에서app.exec_()시점부터 모든 동작이 시작됩니다. QApplication.exec_()를 통해 관리되는 Event Loop는 어떤 Event가 들어왔을 때, Event를 Event Handler에 전달하여 Event가 처리되도록 합니다.
- 그 다음으로 선언된 클래스가 상속 받은
QMainWindow의 기능에 대하여 살펴보도록 하겠습니다. QMainWindow는 어플리케이션이 보여질 창이 되며 최소한 1개의QMainWindow가 존재해야 합니다. 구현 방식에 따라 여러 개의 QMainWindow가 있을 수도 있습니다.- 마지막 QMainWindow가 닫혔을 때 어플리케이션이 종료가 됩니다.
- 위 코드에서
window = MainWindow()를 이용하여QMainWindow를 상속받은 객체를 선언하고window.show()를 통해 Window를 화면에 표시합니다. - QMainWindow에 관련된 자세한 내용은 링크를 참조하시기 바랍니다.
Signals, Slots, Events
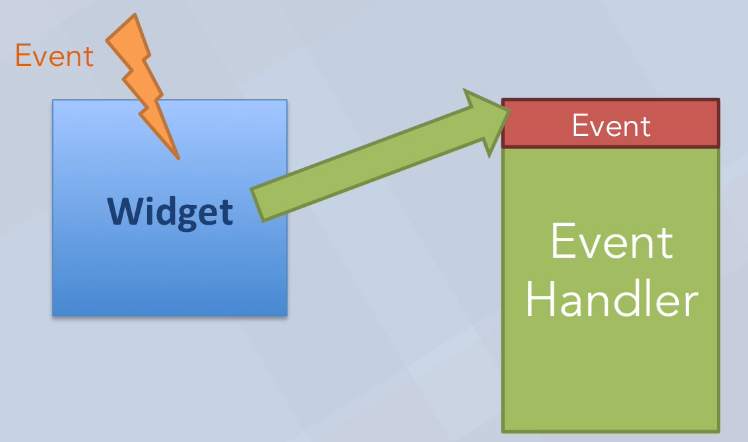
- 위 그림과 같이 어떤 이벤트가 위젯 (사용자 인터페이스를 구성하는 요소)으로 입력되면 이벤트 핸들러로 이벤트를 전달합니다.
- 대표적인 위젯으로는 버튼이 있습니다. 다음과 같이 위젯 버튼을 간단하게 구성할 수 있습니다.
import sys
from PyQt5.QtWidgets import *

def ClickedSlot():
    print("Clicked")

app = QApplication(sys.argv)
button = QPushButton("Push")
button.clicked.connect(ClickedSlot)
button.show()

app.exec_()

- 어떤 위젯에 이벤트가 발생하면 해당 위젯은
Signal을 만듭니다. 위 코드에서 위젯인 button에 붙은 함수인clicked.connect()를Signal이라고 하며 바로 위 그림에서 화살표에 해당합니다. - 그러면 시그널이 발생하였을 때, 수행해야 할 동작이 필요합니다. 이 동작을 함수 형태로 정의해 주어야 합니다. 이 때 정의된, 함수를
Slot이라고 합니다. (callback 함수와 Slot은 같은 의미이며 PyQt에서는 Slot으로 지칭합니다.)
- 앞에서 다룬 Hello World 예제를 응용해서 보면 아래 코드와 같이 Signal을 생성할 수 있습니다.
import sys
from PyQt5.QtWidgets import QApplication, QLabel, QMainWindow
from PyQt5.QtCore import Qt

# QMainWindow 하위 클래스를 사용하여 응용 프로그램의 기본 창을 사용자 지정합니다.
class MainWindow(QMainWindow):

    def __init__(self, *args, **kwargs):
        super(MainWindow, self).__init__(*args, **kwargs)

        title = "Title"
        self.windowTitleChanged.connect(lambda : self.onWindowTitleChange(title))
        # self.windowTitleChanged.connect(self.onWindowTitleChange)

        self.setWindowTitle(title)
        label = QLabel("Hello World")

        # `Qt` 네임 스페이스에는 사용자 정의 할 수있는 많은 속성이 있습니다.
        # widgets의 기능은 다음 링크를 참조하시기 바랍니다.http://doc.qt.io/qt-5/qt.html
        label.setAlignment(Qt.AlignCenter)

        # Window의 중앙 위젯을 설정합니다.
        # 위젯은 기본적으로 Window의 모든 공간을 차지하도록 확장됩니다.
        self.setCentralWidget(label)

    def onWindowTitleChange(self, s):
        print(s)

app = QApplication(sys.argv)

window = MainWindow()
window.show()

app.exec_()
- 위 클래스에서
windowTitleChanged.connect()를 시그널로 생성하였고onWindowTitleChange라는 멤버 함수를 Slot으로 실행하였습니다. - 특히
lambda함수와 같이 응용하면 (lambda : self.onWindowTitleChange(title)) 매개변수를 직접적으로 전달할 수 있습니다. - 다음 코드와 같이 응용할 수 있습니다. 다음 코드는 0 ~ 9 까지 버튼 위젯을 만든 후 버튼을 눌렀을 때, 그 버튼의 숫자가 출력되도록 합니다.
import sys
from PyQt5.QtWidgets import *
from PyQt5.QtCore import *
from PyQt5.QtGui import *

# QMainWindow 하위 클래스를 사용하여 응용 프로그램의 기본 창을 사용자 지정합니다.
class MainWindow(QMainWindow):

    def __init__(self, *args, **kwargs):
        super(MainWindow, self).__init__(*args, **kwargs)
        layout = QHBoxLayout()

        for num in range(10):
            button = QPushButton(str(num))
            button.pressed.connect(lambda n=num: self.PrintButton(n))
            layout.addWidget(button)

        widget = QWidget()
        widget.setLayout(layout)

        self.setWindowTitle("Title")
        self.setCentralWidget(widget)

    def PrintButton(self, n):
        print(n)

app = QApplication(sys.argv)

window = MainWindow()
window.show()

app.exec_()
LineEdit Widget (ID, 비밀번호 입력)

import sys
from PyQt5.QtWidgets import *

class Window(QWidget):
    def __init__(self):
        super().__init__()
        # 화면의 (x : 150, y: 50) 위치에서 (width : 300, height : 450) 크기의 윈도우가 생성됩니다.
        self.setGeometry(150, 50, 300, 450)
        # Window의 Title을 지정합니다.
        self.setWindowTitle("윈도우의 제목")
        self.UI()

    def UI(self):
        # QLabel은 GUI에 고정된 텍스트를 입력합니다.
        self.text = QLabel("아이디와 비밀번호를 입력하세요", self)
        # QWidget 에서 상속받은 객체들은 move 함수를 가지고 있고
        # 이 함수는 각 객체의 위치 (x좌표, y좌표)를 나타냅니다.
        self.text.move(50, 50)

        # QLineEdit는 사용자로 부터 문자열을 입력 받도록 합니다.
        self.nameTextBox = QLineEdit(self)
        # QLineEdit의 setPlaceholderText는 QLineEdit의 기본 값을 나타냅니다.
        self.nameTextBox.setPlaceholderText("ID를 입력하세요")
        self.nameTextBox.move(50, 100)

        self.pwdTextBox = QLineEdit(self)
        self.pwdTextBox.setPlaceholderText("비밀번호를 입력하세요")
        # QLineEdit의 setEchoMode는 입력 받은 문자열을 비밀번호 처리하듯 보여줍니다.
        self.pwdTextBox.setEchoMode(QLineEdit.Password)
        self.pwdTextBox.move(50, 150)

        # QPushButton은 클릭할 수 있는 버튼을 만듭니다.
        self.enterButton = QPushButton("입력", self)
        self.enterButton.move(50, 200)
        # QPushButton.clicked.connect를 통하여 버튼을 클릭하였을 때
        # 동작해야 할 함수를 지정할 수 있습니다.
        self.enterButton.clicked.connect(self.getValues)

        # Window를 띄웁니다.
        self.show()

    def getValues(self):
        name = self.nameTextBox.text()
        password = self.pwdTextBox.text()
        self.text.setText("ID : " + name + ", Password : " + password)

def main():
    App = QApplication(sys.argv)
    window = Window()
    sys.exit(App.exec_())

if __name__ == "__main__":
    main()
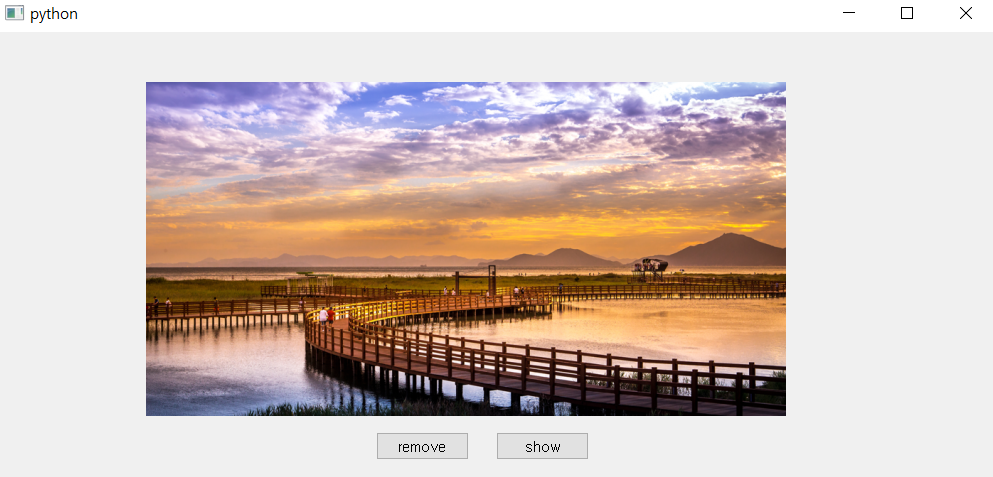
- 이번에는 이미지를 삽입하는 방법을 다루어 보겠습니다.
import sys
from PyQt5.QtWidgets import *
from PyQt5.QtGui import QPixmap

class Window(QWidget):
    def __init__(self):
        super().__init__()
        # 화면의 (x : 150, y: 50) 위치에서 (width : 300, height : 450) 크기의 윈도우가 생성됩니다.
        self.setGeometry(150, 50, 1000, 450)
        # Window의 Title을 지정합니다.
        self.UI()

    def UI(self):
        # 이미지를 삽일 할 때에도 QLabel을 이용합니다.
        self.image = QLabel(self)
        # QLabel의 속성에 보면 setPixmap이 있는데 이 값을 통하여 이미지를 지정합니다.
        self.image.setPixmap(QPixmap("image.png"))
        self.image.move(150, 50)

        remove_button = QPushButton("remove", self)
        remove_button.move(380, 400)
        remove_button.clicked.connect(self.Remove)

        show_button = QPushButton("show", self)
        show_button.move(500, 400)
        show_button.clicked.connect(self.Show)

        # Window를 띄웁니다.
        self.show()

    def Remove(self):
        self.image.close()

    def Show(self):
        self.image.show()

def main():
    App = QApplication(sys.argv)
    window = Window()
    sys.exit(App.exec_())

if __name__ == "__main__":
    main()
CheckBox 사용법
checkbox를 사용하려면 다음과 같이UI에 입력하면 됩니다.
self.checkbox = QCheckBox("This is checkbox", self)
- 그리고 이 체크박스가 체크되었는 지 아닌 지 확인 하려면 다음과 같이 확인하면 됩니다.
- 즉, 어떤 함수에서 다음과 같이 작성하면 체크박스 여부에 따라 프로그램을 작성해 나아갈 수 있습니다.
if (self.checkbox.isChecked()):
    print("Checkbox is checked")
def UI(self):
    self.checkbox = QCheckBox('checkbox')
    self.checkbox.stateChanged.connect(self.checkbox_event)
    # checkbox의 기본값을 check가 되도록 설정합니다.
    self.checkbox.setChecked(True)

def checkbox_event(self):
    if self.checkbox.isChecked():
        print("checkbox is checked")
    else:
        print("checkbox is unchecked")
메시지 박스
- 메시지 박스를 생성하려면 아래 코드의
QMessageBox를 이용하면 됩니다.
from PyQt5.QtWidgets import QMessageBox
QMessageBox.about(self, "Title", "Message")
## Window 타이틀 설정
QMainWindow을 통해 생성한 Window 창의 타이틀을 설정할 때 아래 코드를 사용합니다.
class MainWindow(QMainWindow):

    def __init__(self, *args, **kwargs):
        # ...
        title = "title
        self.setWindowTitle(title)
        # ...
Window 크기 설정
QMainWindow을 통해 생성한 Window 창의 크기를 설정할 때 다음 코드 (self.setGeometry(x, y, width, height))를 사용합니다.
class MainWindow(QMainWindow):

    def __init__(self, *args, **kwargs):
        # ...
        x = 100
        y = 200
        width = 300
        height = 400
        # Window의 좌측 상단 끝 좌표가 (x, y)이고 가로 길이 : width, 세로 길이 : height
        self.setGeometry(x, y, width, height)
        #
Tkinter를 이용한 화면 해상도 확인
- 현재 화면의 해상도를 확인 할 수 있는 방법은 많이 있습니다. 그 방법 중 추가적인 패키지를 설치하지 않고 기본 패키지 만으로 확인하고 싶을 때, 기본 패키지 중 하나인
Tkinter를 이용하면 됩니다. 코드는 다음과 같습니다.
import tkinter as tk

root = tk.Tk()

screen_width = root.winfo_screenwidth()
screen_height = root.winfo_screenheight()
QLabel 필수 정보 변경
QLabel을 통해 생성한 Label에 지정해야 할 가장 기본 속성은 Label의 Font 및 Font 크기, Label 크기, Window에서 라벨의 위치 입니다.- 아래 코드를 이용하여 기본적인 라벨의 속성을 지정할 수 있습니다.
def SetLabel(self, label_text, nth):
    label = QtWidgets.QLabel(label_text, self)
    label.setFont(QtGuiQFont('맑은 고딕', 18))
    label.resize(self.width_length, self.heigh_length)
    label.move(self.label_x , self.label_y)

    return label
디렉토리 설정 이벤트 함수
- 어떤 버튼을 눌렀을 때, 디렉토리를 찾는 이벤트를 발생시키려면 다음 함수를 사용할 수 있습니다.
def GetDirPath(self):
    dialog = QtWidgets.QFileDialog()
    path = dialog.getExistingDirectory(None, "Select Folder")
    print(str(path))
Line Edit 설정 이벤트 함수
def SetLineEdit(self):
    line_edit = QtWidgets.QLineEdit(self)
    line_edit.resize(self.width, self.height)
    line_edit.move(self.x, self.y)
    line_edit.setPlaceholderText("This is the default display value of the shade color.")
    line_edit.setAlignment(QtCore.Qt.AlignCenter)
    line_edit.setText("This is default value.")

    return line_edit
메시지 박스 생성 이벤트 함수
- 메시지 박스를 생성할 때, 다음 함수를 이용하여 이벤트를 생성할 수 있습니다.
from PyQt5 import QtWidgets
def MakeMessageBox(self, title, text):
    message = QtWidgets.QMessageBox()
    message.setWindowTitle(title)
    message.setFont(QtGui.QFont('맑은 고딕', 10))
    message.setText(text)
    message.exec_()
- 더 많은 메시지 박스 관련 내용은 다음 링크를 통해 확인할 수 있습니다.
- 링크 : https://techwithtim.net/tutorials/pyqt5-tutorial/messageboxes/
MainWindow 종료
- MainWindow를 종료하는 가장 쉬운 방법은 생성된 창의 오른쪽 상단의 X 표시를 클릭하여 종료시키는 방법입니다.
MainWindow클래스에서 종료하는 코드를 넣으려면 대표적으로self.close()를 사용하는 방법이 있습니다.- 예를 들어 종료하려는 시점에서
self.close()를 넣으면 MainWindow를 상속 받은 클래스가close()를 실행하여 종료하게 됩니다. - 만약 어떤 버튼을 눌러서 종료하고 싶다면
self.closeslot으로 바로 사용할 수 있습니다. Signal을 생성하고 Signal에 대응하는 Slot에self.close를 사용합니다. - 예를 들어
button.clicked.connect(self.close)와 같은 형태를 작성하면 어떤 버튼을 눌렀을 때, Window는 종료됩니다.