segmentation 학습을 위한 one hot label 생성 및 Loss 연산
2021, Mar 28
목치
-
one hot label 생성 방법
-
ignore index를 반영한 one hot label 생성 방법
-
segmentation 모델의 출력과 one hot label로 Loss 구하기
one hot label 생성 방법
- segmetation을 딥러닝으로 학습할 때, Loss 함수로 Pytorch에서 제공하는
Cross Entropy Loss를 많이 사용하곤 합니다. Cross Entropy Loss이외에도Dice Loss,IoU Loss,Focal Loss등 다양한 Loss 함수가 있으며 이러한 Loss 함수들은 경우에 따라서 Custom Loss Function 따로 작성하여 써야 하는 경우가 종종 발생합니다.- 이번 글에서 다루는
one hot label은 Custom Loss Function을 작성하여 사용할 때, 필요한 부분입니다.
- segmentation 모델의 입력으로 들어가는 한 장의 이미지는
(Batch, Channel, Height, Width) = (1, 3, Height, Width)의 크기를 가집니다. - 일반적으로 이미지를 읽어들였을 때,
(Channel, Height, Width) = (3, Height, Width)또는(Height, Width, Channel) = (Height, Width, 3)와 같이 Height, Width, Channel 3가지 정보를 가지게 됩니다. 이 때, 한번에 학습할 이미지의 양 까지 추가되어 최종적으로는(Batch, Channel, Height, Width)와 같은 형태를 가집니다.
- 반면 모델의 출력과 비교가 되는
label의 경우 여러 개의 Channel을 가지지 않으므로Pytorch와 같은 Framework에서는(Batch, Height, Width)의 형태로 입력 받습니다. - 따라서 한 장의
label이미지를 입력받는 경우 단순히 2차원 행렬인(Height, Width)형태로 입력 받도록 작성되어야 합니다.
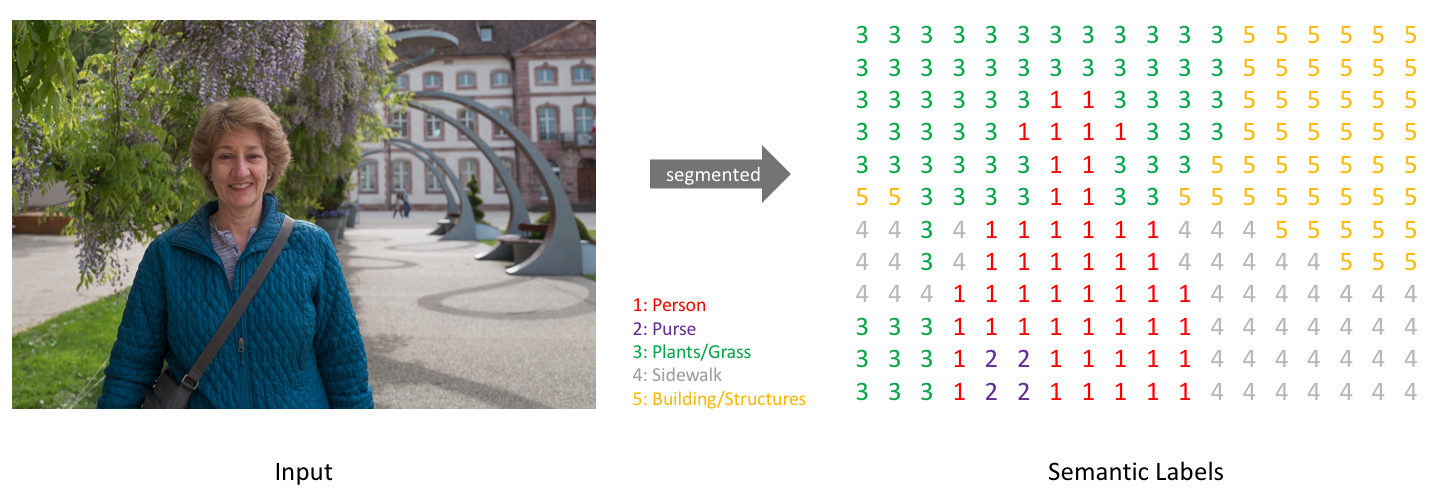
- 위 그림에서 왼쪽 이미지는 일반적인
RGB이미지 입니다. 이와 같이 segmentation 모델의 입력으로 들어가게 될 이미지는(Height, Width, Channel)또는(Channel, Height, Width)의 크기를 가집니다. - 반면 위 그림에서 오른쪽 이미지는 단순히 행렬 형태의
label이미지 입니다. 각 값은 픽셀 별 클래스 값을 가지므로 일반적으로 0 부터 시작하고 (클래스 갯수 - 1)의 값을 최댓값으로 가집니다. 이미지를 읽었을 때에는(Height, Width)만을 가지는 2차원 데이터 입니다.
Pytorch에서 제공하는 Loss Function은 앞에서 설명한 데이터 타입을 따릅니다.image: (B, C, H, W)의 shape을 가져야 합니다.label: (B, H, W)의 shape을 가져야 합니다.
- Pytorch의 Loss Function 내부에서 Loss 계산을 할 때,
segmentation 모델의 출력과label이 연산이 가능하도록label을 변경해야 합니다.

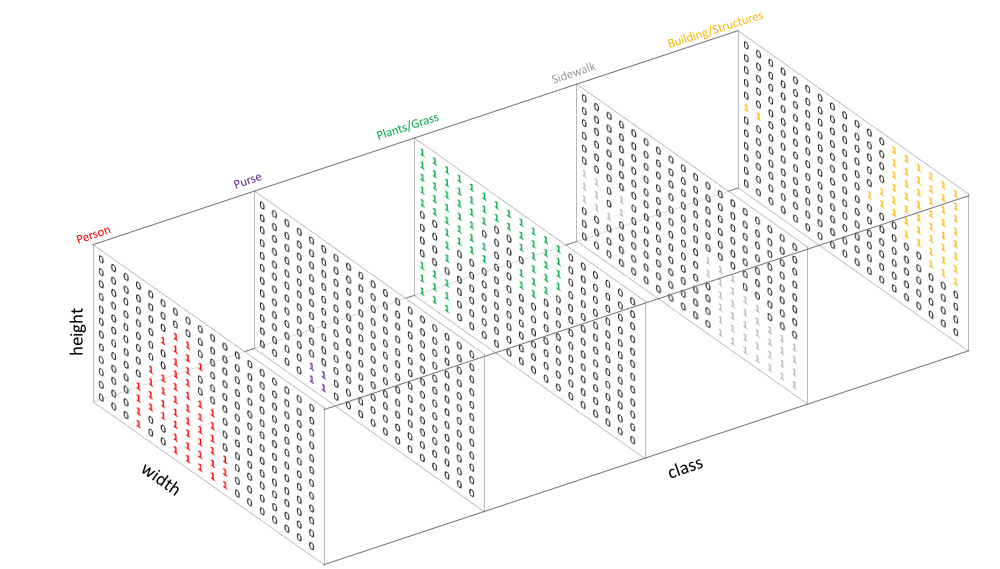
segmentation 모델의 출력은 위 그림과 같이 픽셀 단위 별로 class의 갯수 만큼의 확률 값을 가지는 벡터가 생기게 되고 (height, width) 크기로 묶어서 보았을 때, 위 그림과 같습니다. 따라서 Loss를 구하기 위해label을segmentation 모델의 출력과 같은 형태로 만들어 주어야 합니다.- 따라서
label을 위 그림과 같이 Channel 방향으로one-hot형태로 만듭니다. 즉, Channel은 클래스의 갯수 만큼 사이즈를 가지고 해당 해당 클래스에 해당하는 인덱스에 1의 값을 가지도록label을 변경합니다. 따라서label의 shape은(B, H, W) → (B, #class, H, W)로 바뀌게 되며 클래스 dimension은 0 (또는 0에 매우 가까운 값)과 1 (또는 1에 매우 가까운 값)을 가지게 됩니다.
- 이와 같이
(B, H, W)형태의label을(B, C=#class, H, W)형태의one-hot형태로 바꾸어 주는 코드는 다음과 같습니다.
import torch
from typing import Optional

def label_to_one_hot_label(
    labels: torch.Tensor,
    num_classes: int,
    device: Optional[torch.device] = None,
    dtype: Optional[torch.dtype] = None,
    eps: float = 1e-6,
) -> torch.Tensor:
    r"""Convert an integer label x-D tensor to a one-hot (x+1)-D tensor.

    Args:
        labels: tensor with labels of shape :math:`(N, *)`, where N is batch size.
          Each value is an integer representing correct classification.
        num_classes: number of classes in labels.
        device: the desired device of returned tensor.
        dtype: the desired data type of returned tensor.

    Returns:
        the labels in one hot tensor of shape :math:`(N, C, *)`,

    Examples:
        >>> labels = torch.LongTensor([
                [[0, 1],
                [2, 0]]
            ])
        >>> label_to_one_hot_label(labels, num_classes=3)
        tensor([[[[1.0000e+00, 1.0000e-06],
                  [1.0000e-06, 1.0000e+00]],

                 [[1.0000e-06, 1.0000e+00],
                  [1.0000e-06, 1.0000e-06]],

                 [[1.0000e-06, 1.0000e-06],
                  [1.0000e+00, 1.0000e-06]]]])

    """
    shape = labels.shape
    # one hot : (B, C=num_classes, H, W)
    one_hot = torch.zeros((shape[0], num_classes) + shape[1:], device=device, dtype=dtype)

    # labels : (B, H, W)
    # labels.unsqueeze(1) : (B, C=1, H, W)
    # ret : (B, C=num_classes, H, W)
    ret = one_hot.scatter_(1, labels.unsqueeze(1), 1.0) + eps
    return ret
labels = torch.LongTensor([
                [[0, 1],
                [2, 0]]
            ])
label_to_one_hot_label(labels, num_classes=3)

# tensor([[[[1.0000e+00, 1.0000e-06],
#           [1.0000e-06, 1.0000e+00]],

#          [[1.0000e-06, 1.0000e+00],
#           [1.0000e-06, 1.0000e-06]],

#          [[1.0000e-06, 1.0000e-06],
#           [1.0000e+00, 1.0000e-06]]]])
- 위 예제를 살펴보면 (2, 2) 크기의
labels을 임시로 만들었습니다. 클래스는 총 3개입니다. 함수label_to_one_hot_label를 이용하여 실행을 하면 위 주석 부분의 출력과 같이 나타나는 것을 확인할 수 있습니다. - 위 출력을 보면
labels의 값이one-hot의 인덱스이고 그 인덱스 부분에 해당하는 값은 1을 가지고 그 이외의 부분은 0에 가까운 값을 가지는 것을 확인할 수 있습니다. channel 방향으로 인덱스를 적용해 보면 쉽게 이해할 수 있습니다. - 위 코드에서
.scatter_의 동작이one-hot의 핵심이며 동작 방식은 다음 링크에서 확인 가능합니다.- 링크 : torch.scatter 사용 방법
ignore index를 반영한 one hot label 생성 방법
- 만약
one hot label을 만들 때,ignore_index설정이 필요한 경우가 발생합니다.ignore_index에 해당하는 label은 one hot의 모든 값을 0으로 설정하도록 만드는 경우에 해당합니다. - 이와 같이 만드는 경우는 Loss를 계산할 때, 계산이 되지 않도록 무시하기 위함입니다. 이와 같은 기능은 Pytorch에서 제공하는 Loss에도 구현되어 있습니다.
- 아래 코드에서는
ignore_index가 일반적으로 사용하는 label보다 항상 큰 값을 사용한다는 것을 가정합니다. 예를 들어 label이 0 ~ 10까지 사용되었다면ignore_index는 10보다 큰 수를 사용하는 것을 가정하는 것입니다.
import torch
import torch.nn as nn
import torch.nn.functional as F
import numpy as np
from typing import Optional

def label_to_one_hot_label(
    labels: torch.Tensor,
    num_classes: int,
    device: Optional[torch.device] = None,
    dtype: Optional[torch.dtype] = None,
    eps: float = 1e-6,
    ignore_index=100,
) -> torch.Tensor:
    r"""Convert an integer label x-D tensor to a one-hot (x+1)-D tensor.

    Args:
        labels: tensor with labels of shape :math:`(N, *)`, where N is batch size.
          Each value is an integer representing correct classification.
        num_classes: number of classes in labels.
        device: the desired device of returned tensor.
        dtype: the desired data type of returned tensor.

    Returns:
        the labels in one hot tensor of shape :math:`(N, C, *)`,

    Examples:
        >>> labels = torch.LongTensor([
                [[0, 1],
                [2, 0]]
            ])
        >>> one_hot(labels, num_classes=3)
        tensor([[[[1.0000e+00, 1.0000e-06],
                  [1.0000e-06, 1.0000e+00]],

                 [[1.0000e-06, 1.0000e+00],
                  [1.0000e-06, 1.0000e-06]],

                 [[1.0000e-06, 1.0000e-06],
                  [1.0000e+00, 1.0000e-06]]]])

    """
    shape = labels.shape
    # one hot : (B, C=ignore_index+1, H, W)
    one_hot = torch.zeros((shape[0], ignore_index+1) + shape[1:], device=device, dtype=dtype)

    # labels : (B, H, W)
    # labels.unsqueeze(1) : (B, C=1, H, W)
    # one_hot : (B, C=ignore_index+1, H, W)
    one_hot = one_hot.scatter_(1, labels.unsqueeze(1), 1.0) + eps

    # ret : (B, C=num_classes, H, W)
    ret = torch.split(one_hot, [num_classes, ignore_index+1-num_classes], dim=1)[0]

    return ret
- 위 코드 설명을 위해 실제 사용되는 label = 0 ~ 9로 가정하고 ignore_index=30이라고 가정하고 설명해 보겠습니다.
- 위 코드에서는 dimension=1 방향으로
ignore_index=30만큼의 크기를 가지는ont hot label을 만든 후num_classes=10만큼 split 하여 dimension 방향으로 num_classes=10 만큼만 사용하도록 합니다. label: (B, H, W) →one hot label: (B, C=ignore_index, H, W) →one hot label: (B, C=num_classes, H, W)로 크기가 변경됩니다.
segmentation 모델의 출력과 one hot label 로 Loss 구하기
- 앞의 과정을 통하여
image와label각각의 연산은 다음과 같은 과정을 거쳐서 shape이 결정되는 것을 확인하였습니다. - ①
image:(B, C=3, H, W)→ segmentation 모델 →(B, C=#class, H, W) - ②
label:(B, H, W)→ one hot label 생성 →(B, C=#class, H, W)
(B, C=#class, H, W)로 크기가 같아졌으므로 두 텐서를 단순히 곱하면 element-wise로 곱을 하게 됩니다. 곱의 결과를 살펴보면 one-hot에서 hot(1)에 해당하는 클래스 부분의 확률 값은 유지되고 나머지 부분은 0 또는 0에 가까운 값이 곱해져서 0에 수렴하게 됩니다. 이 결과를 이용하여 Loss를 구하게 되며 그 순서는 다음과 같습니다.- ① segmentation 모델을 이용하여 prdict를 구합니다. (
(B, C=3, H, W)→ segmentation 모델 →(B, C=#class, H, W)) - ② label을 ont hot label로 생성합니다. (
(B, C=#class, H, W)) - ③ (B, C, H, W)에서 C (Channel) 방향으로 sum을 합니다. (
(B, H, W)) - ④ 최종 Loss 값이 스칼라 값이 되도록 하기 위하여
mean(또는sum)을 적용하여 스칼라 값을 구합니다.
import cv2

# image : (1, 3, H, W)
image = cv2.imread("input.png")
label = cv2.imread("label.png")

predict = segmentation(image)
one_hot_label = label_to_one_hot_label(label, num_classes=10)
loss_temp = torch.sum(predict * one_hot_label, dim=1)
loss = torch.mean(loss_temp)
# loss = torch.sum(loss_temp)